Showing posts with label Tummy Talk. Show all posts

Monday, June 29, 2015

THE TASTE OF 'TIPPLE'


Weekly Challenge #224
"Monotangle: 'Tipple' "

   It was so nice to see that this week's challenge was to use the tangle, 'Tipple'. This tangle just fits anywhere and everywhere. 
   Sunday, I received a recipe from my sister for Chia pudding. It is very much like Tapioca pudding. It is quite yummy! Anyways, when I made it, I looked at it and thought, this looks just like 'Tipple'. Then today I was driving my kiddos to the library and it started sprinkling on my windshield. (Not to get excited about that sprinkle here in CA,....... that's all it was. Just a two minute sprinkle!) Well, as those few sprinkles hit my windshield, they kind of separated into little balls of water. I just had to share this excitement with my kids and say, "Look, there's 'Tipple', again!" So twice I had inspiration coming at me for this week's challenge.


   I added some fruit to give it that touch of color. Prismacolor pencils were used for the fruit.


   I can't wait to share with you, all of my endeavors while at my CZT seminar. IT WAS SUCH AN AMAZING ADVENTURE!!! 
   Have an amazing week ya' all!!! 
Thank you, to all of you, for the lovely comments that you share with me!
  Oh, I just wanted to share with you this delicious recipe for Chia Pudding. It also includes the nutritional benefits. Enjoy the taste of 'Tipple'. :0)

I hope you can read it. Click on image to enlarge.


Now, 
go put some
Zen
into this 
TaNGled
world
!
:0)


Saturday, October 12, 2013

FAST, EASY, AND DELICIOUS , DORITOS TACO SALAD


DORITOS TACO SALAD


Ingredients:

1 lb. of ground beaf
1 can of kidney beans (drained)
1 onion
4 tomatoes
8 oz Catalina (Kraft) Dressing
4 oz. grated cheddar cheese
Doritos Nacho Cheese chips
Romaine Lettuce
Avocado (optional)


   In a skillet, brown your ground beef, drain excess grease. Put back on stove and add can of drained kidney beans. Cook for another 5 minutes on medium heat. Set aside.

   Dice onion (I usually use a brown onion) and tomatoes. Put in large salad bowl. 
   Now add your ground beef mix to your onions and tomatoes. Then add grated cheese and Catalina dressing, and mix. In your hand crunch up a 1/2 bag of your regular size Doritos Nacho Cheese chips. (not family size bag)
And mix it all together until you see that everything is coated with dressing.
   Have your lettuce chopped up in sizable pieces. And add taco mixture over the top of your lettuce. Garnish with slices of avocado and a few more Nacho Cheese chips, and Wahla!!! Enjoy!!!
   *for other variations you can add Hot sauce, Taco sauce and/or even nacho cheese. It's up to you!
Feeds 8


This recipe is one of my go to's when I don't have a lot of time!
Kids love it!!
 I add hot sauce to individual bowls, not everybody's palettes
are used to spicy, yet. 
One of the best things, you won't feel miserably full after your delicious meal!


Mangia Mangia!!

:0)


Ps. As always, your comments are welcome!!  Peace be yours, Annette


Saturday, January 19, 2013

The 'ONE' Crockpot Dip for Super Bowl


"THE ONE"


This is seriously the 'BEST' dip you'll ever make!!!!
And talk about easy,.........Wow!!!
I have had this recipe forever! And I really don't remember who
I got it from. It has been a favorite in my circle of family and friends forever.
 It is requested every year for those certain occasions.
New Years Eve and Super Bowl are just two of the mandatory occasions.
But I also make it for any other reason to party and get together!
So here it is! You will understand why I named it the 'One'!
Really, in my cook book,  it's called 
'Spicy Bean Dip"...?


1 pound of ground beef (cooked)
1 large can of refried beans (40.5 oz)
1 pound of Velveeta cheese
1 onion (diced)
1 jar of salsa ( 16 oz, any brand and depending on how spicy you want it, go mild, medium or hot)
               
              Cook up your ground beef first. Then drain the excess grease. Dice up your onions.
Next put your block cheese in the crockpot, your ground beef, the can of beans, salsa, and onions!
Depending on how soon you will be eating, depends on the temperature you put your crockpot on. 
I usually put it all together, 1/2 hour before gathering. And turn the crockpot on high. Make sure you stir every once in a while. Once the cheese is all melted and and it is all blended and mixed, 
turn your crockpot down to warm. And now, spoon it over your favorite corn chips and ENJOY!!


What's great about this dip, is that it is pretty hearty. Because 
of the ground beef and beans, it makes for a pretty filling appetizer!
Men will love it!!

Go Super Bowl!
You will be the 'ONE' scoring points for the 'Best Dip Ever!'


:0)


Please let me know how everybody enjoyed it! And like any recipe, you can change it up however you want! Share with others, your changes!
:0) Annette

Tuesday, November 27, 2012

Mock Lofthouse Cookie Recipe


Last bit of Fall's Delights

This post is to share with you one of my (and many family and friends) favorite desserts.
I found this recipe when I Googled 'Lofthouse Cookie Recipe.'
I think there are a couple different ones but this is the one I found and
tried and stuck with. Because they are sooooo yummy!
I had also found an awesome frosting recipe too but I lost it and can't seem to
find it again. So, if you continue reading, you will see what kind of frosting I use as an alternate.
In my opinion it's perfect, and it's a time saver. (Especially when you
have to make 180 cookies.)
So here is the recipe and feel free to copy it. I have added changes and
little side notes that have helped me perfect it.
Enjoy!

  • 1 Cup of butter 
  • 2 Cups of sugar
  • 3 eggs
  • 1 tsp. of vanilla
  • 1 tsp. of baking soda
  • 1 tsp. of baking powder
  • 1 1/2 Cups of sour cream (it's best with sour cream that is NOT non/or low fat)
  • 5-6 Cups of sifted flour (Start with 5 1/4 cups, until it's not super sticky, a little tacky is ok, because you will be adding flour when rolling your dough out) Too much flour makes for a harder cookie and the dough is not nice when rolling and cutting.
Cream together butter and sugar. Beat in the eggs, vanilla and sour cream.
Then mix in the dry ingredients. I started with 5 1/4 cups of flour and used the rest when I actually rolled them out. Cover and refrigerate overnight or at least 8 hours. This makes the dough easy to roll out and cut. Preheat the oven to 425 degrees. Sprinkle your cutting board (or other rolling surface) liberally with flour. With a well-floured rolling pin, roll out the cookie dough to about 3/8 inch thickness and use floured cookie cutters to cut your shapes. (I separate the dough in about four big clumps, when rolling them out). I put them on cookie sheets and bake them for exactly 8 minutes. ( When I have to make a lot of cookies, I will roll my dough thinner and then heat oven to 400 and bake for 10 minutes. Depending on your oven. If I make them too thick and keep it at 425 sometimes they have browned on outside edges and have not been fully cooked in center. Again, depends on your oven.)

After dough has been refrigerated, your ready to roll and cut! You will fall in love with the feel of this dough! It's such a wonderful texture!
This is just showing the the thickness of the cookie before it's been baked!

I had a hard time finding a turkey cookie cutter, but Michaels came through for me!!!!
Some cutters are bigger than others, but this was a medium size one and I was able to 
bake 20 at a time. And it yielded about 180 cookies!(doubling the recipe)


I actually completed cutting and baking cookies in less than 2 hours. Including clean up!
Here they are! A bunch of lil' turkeys, not realizing they're day is up!!! Heehee
By the way, my family likes them even without icing. They are not overly sweet, but just enough to where you can just 'gobble' them up. (no pun intended) 
:0D


This next step, I added myself. By accident but now I do it know matter what, because it makes the cookies even softer and more moist. After the cookies have cooled, I place them in Ziplock bags. Don't put too many in because they can get too moist and start sticking together. (By the way, you can also freeze 
      these cookies at this point and they will taste as fresh as the day you baked them.)
I put abut 25 of these lil' guys in one 1 gallon Ziplock baggie.


This is the icing that I like to use. Caution: It does NOT harden! It stays soft, so you CANNOT
stack them.
To save money I used pint size Ziplock bags to use for my frosting colors. 
To fill each bag I place the bag over a tall drinking cup, fill it, and then remove it, zip it and wha-lah!
I'm ready to frost!
As you can see, I used four colors. And used the Wilton brand colors.
 Another wonderful thing about this icing, it lasts forever if you keep it in the refrigerator.


The eyeballs I used are found in the cake decorating section at JoAnnes. I'm sure
Michaels carries them too. (I thought they were perfect because they kind of made 
the turkey look scared!!!!)

Anyway, I do hope you give this recipe a try, because it will definitely be a big
hit by all!!! And you can have so much fun with it too!
I hope all of you here in the US, enjoyed your Thanksgiving Holiday!

Now,..... time to get ready for Christmas!

God Bless you 
and 
Thank You!

 :0)

Friday, July 27, 2012

The 'BEST' Cold Coffee Drink ,'EVER'!

That's Right! This is the Best Cold Coffee Drink, Ever!!!

I actually picked up this recipe at a Christmas party 4 years ago, from a friend!
("Thanks, Lisa! I know I always tell you what a big hit this drink has 
become in both of my family circles. But it also has become quite
the request with my circle of friends too!!")
So what better thing to do,......? Share it with the world!


This is where it begins!!!!

This is a single recipe, but I ALWAYS make a double batch, if not a quadruple one!

1 cup boiling water
1/4 cup instant coffee
1/2 cup sugar
1/4 gallon chocolate ice cream
1/4 gallon vanilla ice cream
1/2 gallon milk
bag of ice

   First make your coffee mixture. (I always make mine the night before and put it in the refrigerator, that way it can get cold) Mix the instant coffee, sugar and boiling water. Make sure the coffee and sugar melt. Then store it in a container that will be easy to pour from and travel, if your going to mix it at a party away from home. (My container in this picture could actually hold a quadruple recipe.)
Pour your ice in first, then add your vanilla and chocolate ice creams. Scoop it in small scoops. Then add your milk and then the coffee mixture. And 'Ta-Da'! That's it!!! Enjoy!!

This is before it has been mixed!
You will have some people like it best, right after it is made, so that they get big chunks of 
 ice cream. Then you have those that like it better after the ice cream has melted a little.
Either way, it is is just delicious!
(and did I mention that it is calorie free???,....
Just kiddin')
Scoop it, Slurp it and Enjoy!!!

(side note, if you want to make it into a grown up drink, you can add
Kahlua and or Baileys Irish Cream!)

:0)

Saturday, July 21, 2012

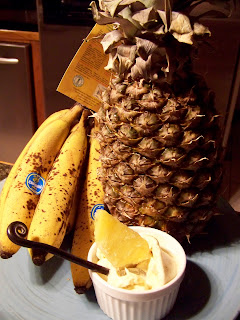
Yonana!!!!

Save Those Brown Spotted Bananas!!!!
(and not for banana bread)


Yes this is an infomercial :0)
The reason for my blog is to share things that I love and
believe in! So, I just love this new machine!
Plus my freezer isn't full of over ripe bananas, waiting to be made
into banana bread, anymore!
My sister-in-law, first bought one, and made us some sorbet' when we
were over they're house. And "Oh my goodness!" I was sold!
You have to use frozen fruit, and always a banana.
The banana gives it the sweetness and makes it so creamy, as if there were
dairy in it. But, (and this is the BEST part), the only
ingredients in it, are the fruits.
It is the purest form of a HEALTHY dessert!!!
There is no fruit juice added either!
Just a banana and whatever other fruit you choose!
Tonight, we had banana and pineapple, But anything goes!
And if you want to make it a little sinful, you can add
chocolate too. But really there is no need!
Did I forget to mention, that kids LOVE it and will ask for more!!

I purchased mine at Bed Bath and Beyond, with 20% coupon I believe
it was around $39.00. So worth the investment!
So "Go Nanas, with Yonana!"
And ENJOY!

:0)

Monday, July 16, 2012

Jello 'Knox Blox'


 "Here's to a Month of Patriotism and Birthday Celebrations"

These are my famous sugar cookies, (sorry you're gonna have to wait for my secret recipe in another post :0).....)


 My oldest son's birthday is on the 4th of July, so it's always fun
to put that patriotic spin to it. (even if it does include dinosaurs)
(until he says otherwise :0)..)
 We had two family celebrations on the 4th, and so today,
was his third one!
I did make another cake, but I also made 'knox blox' jello treats.
These are fun, refreshing, and tasty treats, for Everyone!!!

Growing up we called these 'Knox Blox", but now I think they're called 'Jigglers'. (like always, I modified the recipe)

 Knox Blox

2 cups boiling water
2 cups ice cold water
1  6oz box of favorite jello (I used blue berry and red raspberry)
3 packages of Knox (original unflavored Gelatine)

Boil two cups water and add the 3 packets of gelatine and whisk quickly as you pour it into the water so that it does not clump. Then add your box of flavored jello, and whisk. Next, add your 2 cups ice water. Once cooled, then pour into a 9x13 pan. Carefully put in the refrigerator. (make sure your pan is level.)  Wait about 4 hours or until firm. Then either cut into squares, or use your cookie cutters to create your shapes.

With these left over pieces, I just break them up and then when the kids go to eat them, they try and make out shapes with them. Kinda like finding shapes in clouds.
Before you flip your pan over onto a cutting surface. Go around the edges with a thin utensil to loosen from edges. (you can pull on it a little too, so that it kind of lifts a little from pan). As you turn your pan over, place your hand underneath, just in case you need to help it out. Just be careful and let it come out slowly, as to not let it tear.  Then 'ta-da'. ................and............
Like the commercial use to always say,
"Watch it wiggle, see it Jiggle"
And have fun!!!
 Yum
It's always pretty to put them on a white plate, so your true colors of jello stand out. For Fall I use my leaf cookie cutters with all fall colors, Spring pastel colors with flowers , and so on and so forth.
 :0)


Saturday, June 30, 2012

'Crispy Rice Treats'

'Crispy Rice Treats'

My version of microwaved 'Crispy Rice Treats'

     It never fails, but whenever I make my rice crispy squares for parties, I always have someone ask me how I make them. (now keep in mind, if you're someone that likes them real ooey-gooey, you will NOT like these.) These are not as sweet and sticky but are quite chewy and light! Did I mention, that I can make 3 batches in 30 minutes? That's what's nice about using the microwave, it cuts the time in making them.
The other tid bit is, I use Honey Nut Cheerios and puffed wheat too!

 Here are the ingredients and portions
11 cups of crispy rice or Honey Nut Cheerios (if using Valu Time puffed wheat, use whole bag)
1 bag (16 oz.) mini marshmallows
1/4 cup cubed butter

a large Pyrex bowl
long wooden spoon
non stick spray
sandwich bag that folds (not a ziplock)
and a 9x13 baking pan


Directions:
Pour the whole bag of marshmallows in the Pyrex bowl, cut the butter into fours and put in bowl. Now put in the microwave. (every microwave is different, but I set mine for 3 minutes) Turn on and at the end of the 3 min. The marshmallows will become a big puff. (make sure you watch it because you don't want it to get too big where it messes your microwave.) Then remove the bowl (it will be HOT)!
Stir the marshmallows to where it is a paste texture. Put it back in micro for about 30 sec to 1 min. Until you see it bubble. Remove bowl and start pouring your cereal, of choice, in. Stir each time you add some, so that you're sure to get all the marshmallow off the bottom of the bowl, and it's evenly mixed. Make sure your 9x13 pan is sprayed then spray the sandwich bag.  Pour the mixture into the pan and then insert your hand into the sandwich bag and start pressing firmly into the pan. Be very careful, it will be HOT!
 Once you have packed it in and you have an even tray, then flip it over onto a cutting mat. Leave the pan on for at least 5 min.(that way it will keep it's shape) Then remove the pan and get it ready for your next batch (if you're making more than one). Let them cool before you cut.


 I find if I cut lengthwise first and then the other after, they keep their shape better and it is easier to get even squares. (I use my Cutco  bread knife because it has such a long blade. It helps me keep my lines straight) 4 lines down and 6 across. (that gives you nice size and square treats) you may want to change that for smaller treats.

 This is 3 batches right here. 1 rice crispies, 1 puffed wheat, and 1 Honey Nut Cheerios. As you can see it makes quite a bit for those big summer parties!!! Make sure you do cover them, so they do not dry out.  For my kids parties at school I have even used a cookie cutter to give them fun shapes for different holidays.
Now, you can 'call them what you will',
but "DO ENJOY!"
:0)